
Evo X O2 Eliminator Downpipe Installation
Contributed by Alex KollosTools required
- Ratchet
- 14mm Socket
- 10mm Socket
- 7/8" Socket or Metric Equivalent (O2 Sensor)
- Mechanics Gloves (optional)
While the new Evo's have proven once again to be an awesome performance platform for modifications, we have found that the installation of a new downpipe is just downright not fun. SO, we've decided to do a quick little write up to help everyone out there that hasn't done this before. Grab your gloves boys and girls, here we go!
Step 1
Pop the hood, and remove the plastic engine cover by gently pulling up to expose the valve cover. It doesn't take much force for it to come out of it's mounts (our showcased project car is without a cover, but it is the large plastic cover on the top of the engine that says "MIVEC Turbo").

Step 2
Remove the strut tower brace by removing the 3 14mm nuts on each side on the top of the strut towers, and the 2 14mm bolts in the middle attached to the chassis, and set aside in a safe place. Don't forget, put the 6 nuts back on the strut towers BEFORE you raise the car, or the tops of the struts will fall out of the top of the strut towers. Nothing catastrophic, but not fun...

Step 3
Remove the exhaust manifold heat shield by taking out the 3 10mm bolts, and the firewall heat shield by taking out the 3 10mm bolts, and set both aside in a safe place as well
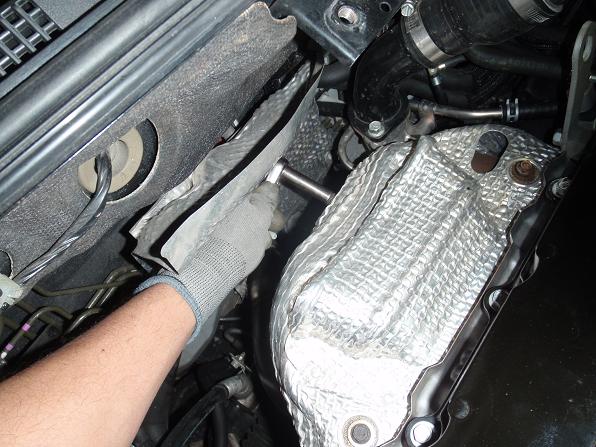


Step 4
With the heat shields out, you have much easier access to all of the bolts that attach the O2 housing to the turbo. Remove the 4 14mm bolts, and the 1 14mm nut to remove the o2 housing from the turbo. The 4 bolt heads face the passenger side of the car, and the nut head faces the drivers side (Note: below picture does NOT show a stock O2 housing/downpipe, and is mearly used as a visual aid)

Here you can see where the holes are on the stock O2 housing. The yellow indicates where the bolts are that face the passenger side of the car, and the red indicates the position of the nut that faces the drivers side of the car on the opposite side of the turbine housing. All of these bolts CAN be removed from the topside of the engine compartment

Step 5
Lift the car. Remove the O2 sensor from the downpipe, and the one after the catalytic converter, and unbolt the stock downpipe from the catalytic converter (or test pipe). For easier removal, we recommend removing the cat (or test pipe) completely from the car before removing the downpipe

Step 6
Everything should be loose! Remove the stock O2 housing and downpipe from the car
Step 7
Reverse steps 1-6 for re-installation of your new downpipe
Step 8
Double check that all of the bolts that you have been playing with for the past hour or 2 are tight, and start the car and check for leaks. Exhaust leaks can be identified by a puffing, or ticking sound coming from any joints or flanges in the exhaust system. ALWAYS USE NEW EXHAUST GASKETS TO PREVENT EXHAUST LEAKS
Step 9
DONE!!! Stand back, admire your amazing mechanical abilities, and enjoy your new downpipe!
Tips and notes:
- As far as downpipe installs go, the Evo X is definitely a bit of a PITA. This job is made 100 times easier with a lift, as are most jobs.
- Certain tools are also a life saver with this install. A good set of ratcheting wrenches is awesome for this job, along with a wide variety of flexible socket elbows, and extensions.
- Some of the bolts are also going to be a bit harder to get to, and tighten from the top like they were with the stock O2 housing. If you are running into issues getting at any of these bolts, some of them can be reached more easily through the passenger side fenderwell with a long extension with the tire off.
- Make sure you spray down any nuts and bolts that are to be removed with a penetrating lube before you start the job for (hopefully) an easier removal, and no broken bolts.
- Exhaust and turbocharger bolts are prone to galling up, crossthreading, and breaking when removing them, so it's a good idea to have a tap and die set if problems arise. The bolts are an M10x1.25.
- Put anti-seize on any exhaust bolt when you're re-installing everything.


Comments (0)
There are no comments for this article. Be the first one to leave a message!