We've been getting tons of questions about our Evo X Surge Tank over the past few weeks. Without further delay, here is our installation guide!
Serious track competitors will benefit from installing an
Evo 10 Surge tank, as fuel starvation is a major issue seen by many
Evo X's that often participate in track racing. Here is how MAPerformance suggests installing the kit, but the location is completely up to you.Lets get started! [caption id="attachment_884" align="alignnone" width="650"]

Click “Continue Reading” to learn how to install your MAPerformance Surge tank![/caption] First, you're going to want to figure out where you're going to mount your surge tank so you can begin laying out your new lines. We installed our tank in the rear fenderwell on the drivers side of the Evo 10, near the EVAP charcoal canister. [caption id="attachment_877" align="alignnone" width="1000"]
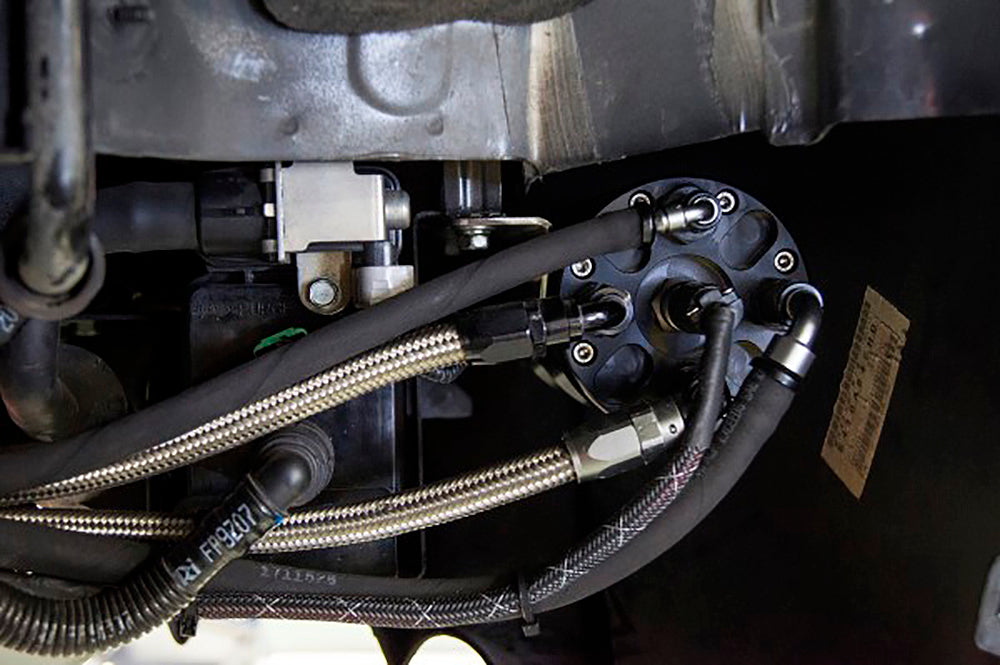
Evo X Surge Tank Location next to Charcoal canister.[/caption] Once you have the surge tank location sorted out, place the fittings on the tank. Don't tighten them down just yet. This is a good way to make sure none of the threads are damaged during the install process. Head to the trunk and begin the wiring process. Using the supplied wiring harness and included wiring diagram, run the fused power wire to the positive battery terminal and solder to the relay's power wire. Run the relay ground wire to the negative terminal on the battery (ground). We recommend attaching the relay to the battery hold-down to keep it secure. Remember to shrink wrap and keep the wiring neat to prevent anything from coming loose and causing a short.
*please note, the image shows an aftermarket big pump, so wiring here is a bit different than most applications. Stock pumps will not have an additional power wire leading from the pump. Now you should have a total of two wires heading down to the surge tank: power and ground. [gallery columns="2" ids="868,869"] Next, we're going to take care of the fuel lines. We're going to be re-using the factory feed line for the return lines and running a new line for the feed. For starters, install one of the supplied 90* fittings on the supplied fuel line. Attach this fitting to the surge tank. Begin routing the new feed line under the car, keeping it away from all moving parts. Run it next to the factory lines and attach to the frame using the supplied clips. Route the line up into the engine bay. Remove the stock feed line from the fuel rail and install on fuel pressure regulator. With the supplied fitting, install the new feed line on the fuel rail. Install the push lock fitting on the stock fuel line and install on hard line. [gallery ids="874,875,876"] Your engine bay should be done, now it's time to move to the back of the car. Start by tightening your fuel feed fitting to the surge tank. Make sure it is tight to prevent leaks. Next, cut the hose off the new return line (old feed hose) and install the push lock fitting on the line. Use the supplied hose to connect the return line to the surge tank. You'll want to make sure all fittings are facing inboard on the surge tank so they all align the same direction. It'll make hooking up all the hoses much easier! Next, head inside the car. Remove the fuel pump cover from underneath the seat. Remove the stock hoses from the pump nipples and replace with supplied hoses and fittings. Using the photo for reference, run your new lines down to the Evo X surge tank and attach them using the supplied fittings. [caption id="attachment_887" align="alignnone" width="625"]
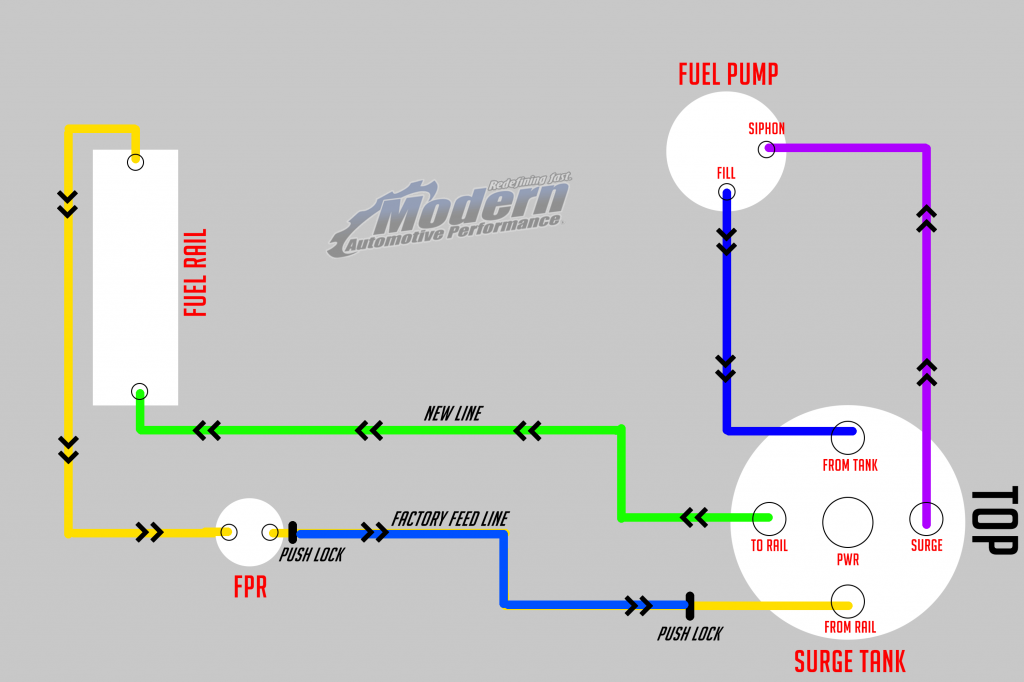
Evo X Surge Tank install diagram[/caption] Before you finish up, verify that you're getting power to the surge tank when the key is turned on. use the diagram below to ensure that everything is hooked up in the right place on the surge tank. If all looks good, start the car. Check for leaks at every fitting and make sure nothing is touching hot exhaust parts or in reach of moving suspension parts. From here, lower the car and take it around the block a few times. You shouldn't have any bogging to sloppy acceleration. If everything checks out, you're done installing your Evo X Surge Tank! Keep an eye for fuel leaks in the future, but all should be good! Be sure to send any feedback our way, and thanks for purchasing the
MAPerformance Evo X Surge tank!

 Evo X Surge Tank install diagram[/caption] Before you finish up, verify that you're getting power to the surge tank when the key is turned on. use the diagram below to ensure that everything is hooked up in the right place on the surge tank. If all looks good, start the car. Check for leaks at every fitting and make sure nothing is touching hot exhaust parts or in reach of moving suspension parts. From here, lower the car and take it around the block a few times. You shouldn't have any bogging to sloppy acceleration. If everything checks out, you're done installing your Evo X Surge Tank! Keep an eye for fuel leaks in the future, but all should be good! Be sure to send any feedback our way, and thanks for purchasing the MAPerformance Evo X Surge tank!


Comments (0)
There are no comments for this article. Be the first one to leave a message!