
While we design and machine some of the components for our in house Fiesta ST products we had some time to test a few products from our project partners. So today we are going to cover our results from the Turbosmart Kompact Shortie BOV, Turbosmart IWG75 Internal Wastegate Actuator, and a quick overview of the Cobb Rear Motor Mount. Also, a little sneak peek at our first of many products that we will be releasing for the Fiesta ST. Let's get started.
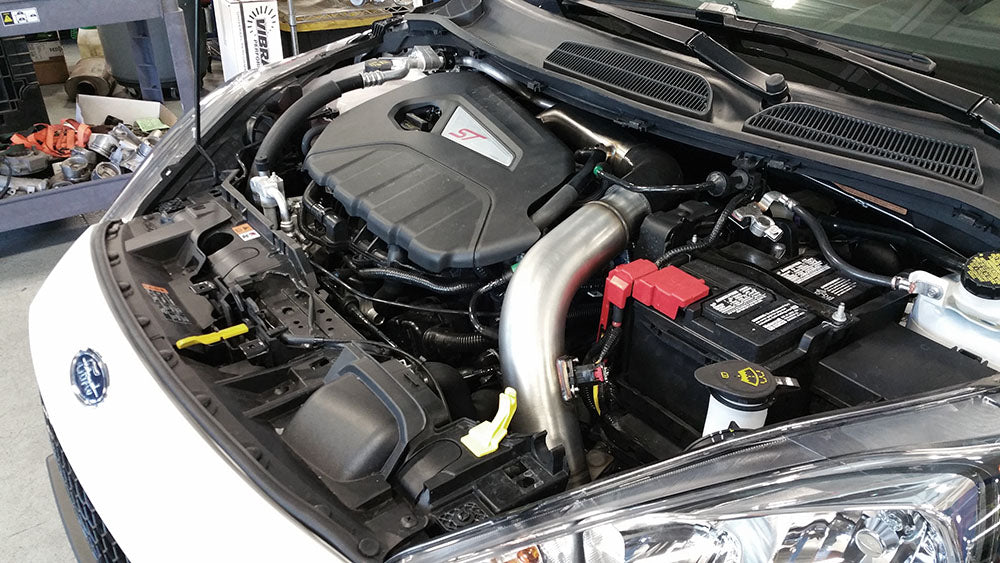
First up is the Kompact Shortie Dual Port BOV. Installation was very simple and straight forward, however there are a few videos on YouTube that outline the installation process. Again, it's as straight forward as removing the factory BPV unit, bolting the new Turbosmart unit on, and installing the adapter and vacuum line under the MAP sensor on the top of the intake manifold. Quick picture of the MAP adapter below.


Click here to buy the Kompact Shortie Dual Port BOV
One step I do recommend is that you set the spring pressure fairly loose before you install it. If you have the cap of the BOV tightened too far down you will have some serious compressor surge, which as awesome as it sounds you don't want. You can easily damage your turbo this way so be sure to have it fairly loose and make sure it blow's off properly. Here is a quick video of a pull in my car with the BOV properly adjusted.
Now, for the results. This is a great modification for scaring people with their window down while driving down the motorway. However, most of the benefits are within the drivability. As a result of this BOV upgrade removing the factory electronically controlled BPV, you are left with a more natural driving feel. A lot of Fiesta ST's running an off the shelf (OTS) tune get a "surging" effect when they are driving partial throttle. This is partly from the factory BPV opening and closing rapidly to try and maintain stoich AFR's as long as possible. The other component of this "surging" is the wastegate actuator which we will get to in a minute. This in turn really kills the driving experience, and makes you realize you are no longer directly connected to the engine through the pedal.
So, what about the power/torque increase? Unfortunately there is zero gains to be had at this stage. The factory BPV, although annoying during part throttle driving, can actually hold a decent amount of boost. Not until you get to around 26psi do you start having some negative affects from the factory BPV. However I still highly recommend this modification for a few reasons. To increase the "mechanical" driving feel, for some people the noise is what they are after and this BOV definitely provides that, and support for future modifications. When you start getting into a stock frame turbo upgrade, like the Cyborg turbo that I see a few customers running, this would be a good addition to ensure you are not bleeding boost through a pull. Now, let's take a look at another great supporting mod that gives you instant results, the Turbosmart IWG75 Wastegate actuator.


Click here to buy the Turbosmart IWG75 Wastegate Actuator
Another fairly straight forward install, the toughest part is getting the factory heatshield off. However once you do it once you will be able to do it 100 times without any snags. We chose to install the IWG75 with the same pre-load as factory, essentially this means we installed it with the same rod length as the factory wastegate actuator. You have the ability to adjust the rod length to add pre-load to the wastegate flapper which makes it harder for the flapper to open. This will aide in controlling higher boost levels, but for the factory turbo OEM pre-load works just fine.
There are instructions included with the wastegate but if you have any questions please feel free to reach out to us and we will gladly help you out. Now, with everything adjusted, installed, and buttoned up it was time to get to get the car strapped onto the dyno and get some datalogs to see what kind of gains we were working with.
Peak power was increased, and though it looks like peak torque was down 3.8ft/lbs that is not actually the case. If you have a look at the graph above of the stock wastegate actuator (light grey) you will see a small spike in torque. This is the result of the factory wastegate spring being too soft and it can't handle boost efficiently, so there was a small boost spike which fluffed up the torque a bit. After a few pulls on the IWG75 wastegate from Turbosmart I was able to produce the same torque. What we should be focusing on is the torque and power gained over the stock wastegate actuator from 3,500rpms and on. On top of the hp/tq gains have a look at how much cleaner the graph is with the Turbosmart actuator. Less spikes and dips, and trust me you can feel this when driving on the street (remember that surge I spoke about?).
Above is a look at boost and Wastegate Duty Cycle (WGDC) logged over these two pulls. You can see that boost was smoother, and held longer through the entire rpm range. This graph also shows that the WGDC's stayed the same and no changes were made, no trickery here just real results. As always I'm impressed with the quality of Turbosmart products and impressed with the results. With the many benefits, I highly recommend Fiesta ST owners to add this to their list of future upgrades. You can't go wrong with instant results, and just like the BOV it will really shine with other modifications as a supporting component. Next up, Cobb Rear Motor Mount upgrade (RMM).

Click here to buy a Cobb Rear Motor Mount!
I won't spend too much time on this upgrade as it is one of the most purchased products on the market, but I wanted to share my thoughts on this upgrade. Simply put, if you don't have a Cobb Rear Motor Mount click here and buy one immediately! The factory rear mount is VERY soft and allows for the motor to rock back and forth VIOLENTLY. The 10 minutes it took to install this mount was well worth it. Crisper shifts, less wheel hop, and just the right amount of vibration to further remind you that you made the right choice. If you like broken axles, this upgrade is not for you.
So, about that sneak peek.....
The next update will be covering the R&D process of our intake system. We are trying a few different variations, one of them being to see if the inlet pipe to the turbo is actually worth upgrading.

Comments (0)
There are no comments for this article. Be the first one to leave a message!