How To Install Eibach PRO-KIT in 2013+ Cadillac ATS
Installing lowering springs is one of the best
Cadillac ATS upgrades you can make. While the stock suspension setup is acceptable for everyday driving, there is nothing wrong with installing a set of
Eibach PRO-KIT springs. This kit comes with everything you need to replace your factory springs, including bump stops. Check out this handy guide we compiled that should help you throughout the installation process.
 Difficulty rating: 3/5, moderate
. Some specialty tools required. May take an afternoon or more depending on your comfort level with suspension work.
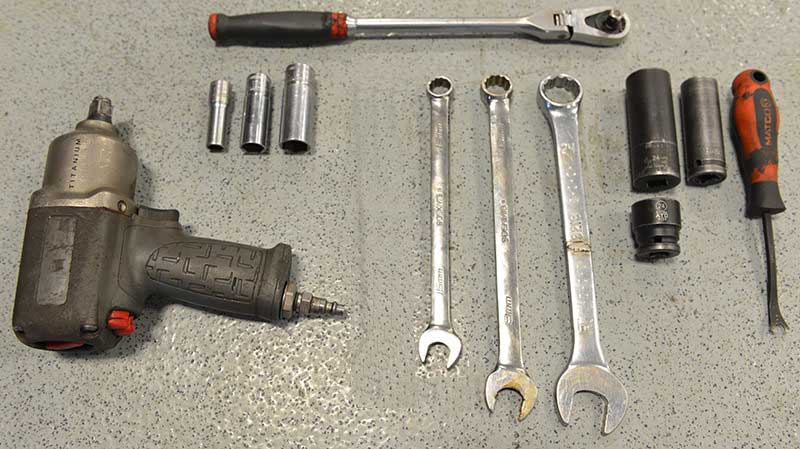
Tools Needed
- 15mm, 18mm, 24mm open ended wrench
- 24mm, 18mm socket, preferrably impact rated
- 10mm, 13mm, 15mm sockets
- 3/8" ratchet
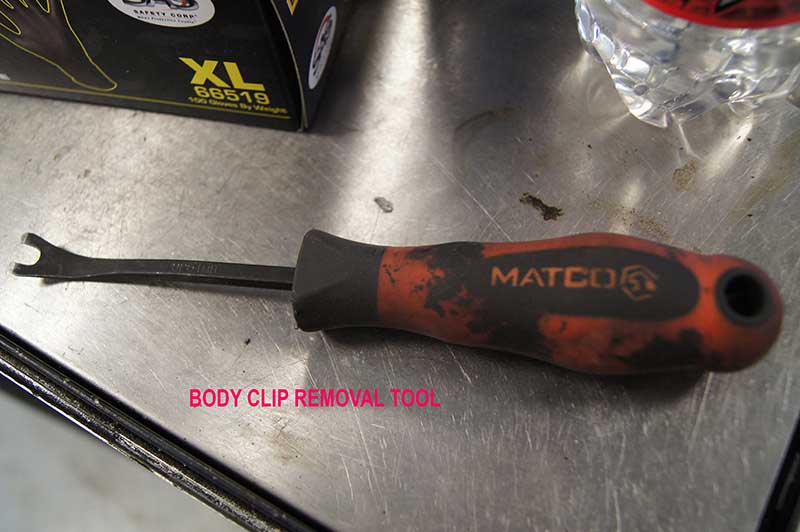
- body clip remover
- air tools and accompanying accessories
- spring compressor, portable style
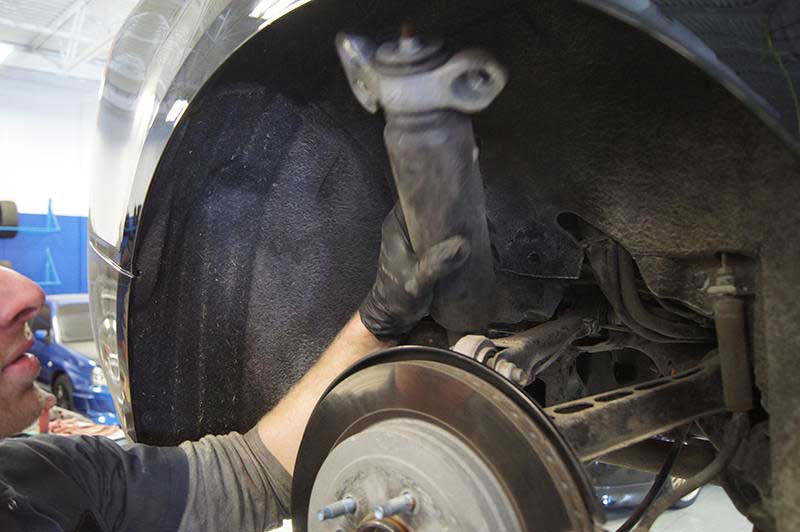
Front Dis-assembly / Removal of stock component
- Loosen lug-nuts with the vehicle on the ground. Lift the car up and remove the front wheels.
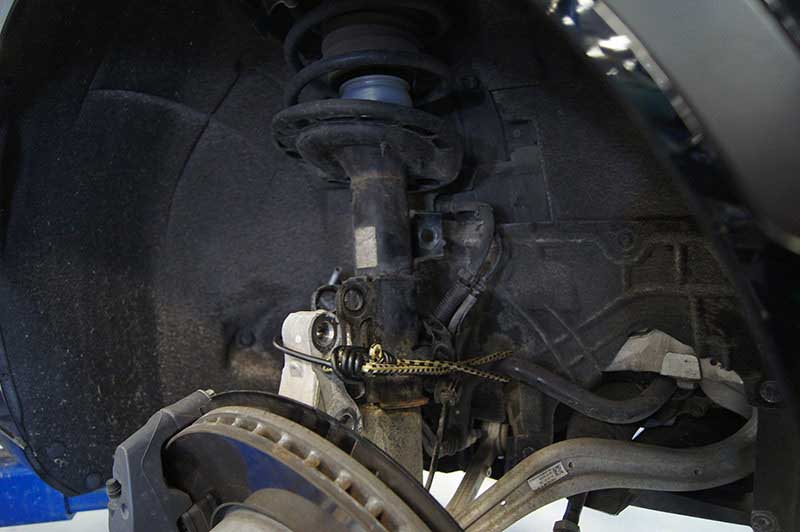
- Remove the sway bar end link. This is a 18mm bolt that is fairly easy to see. You may need a short extension but a deep well socket works perfectly. Loosen the brake line clip 10mm bolt. Gently pull back the securing clip to remove it from the strut assembly. A needle-nose pliers is best for this.
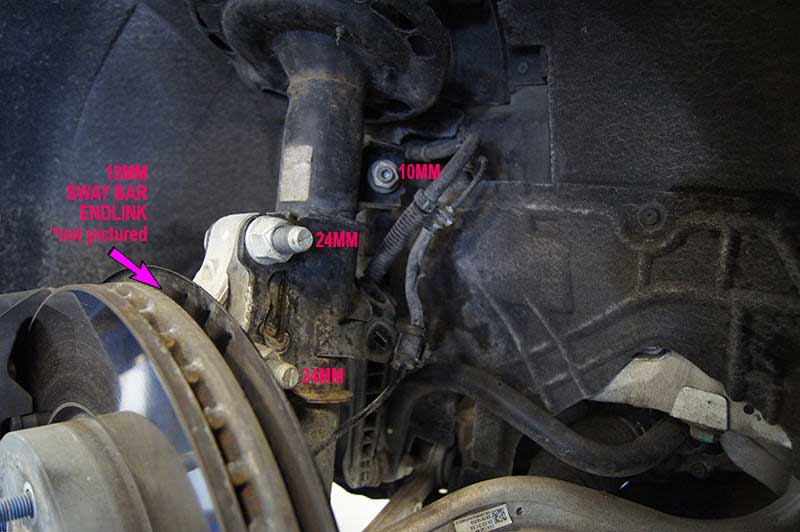
- Remove the two strut mount through-bolts that attach to the hub. These are big, 24mm bolts. They can be pretty tough to loosen, so use penetrating oil with either a breaker bar or air tool. Use a rope or bungy cord to secure the hub to the control arm as it will be free to move around. Avoiding this can potentially damage your brake line.
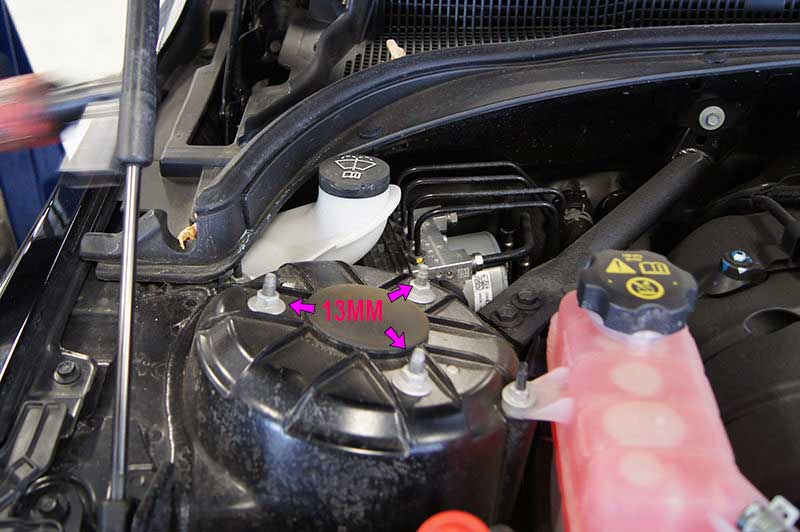
- Remove the three top mount bolts, these are 13mm. Be careful as this will allow the assembly to fall out of the car.
- Repeat the same process on the other side of the car and set the assembled stock struts/springs aside.
Rear Dis-assembly / Removal of stock component
The back is where it gets a little tricky, so follow closely.
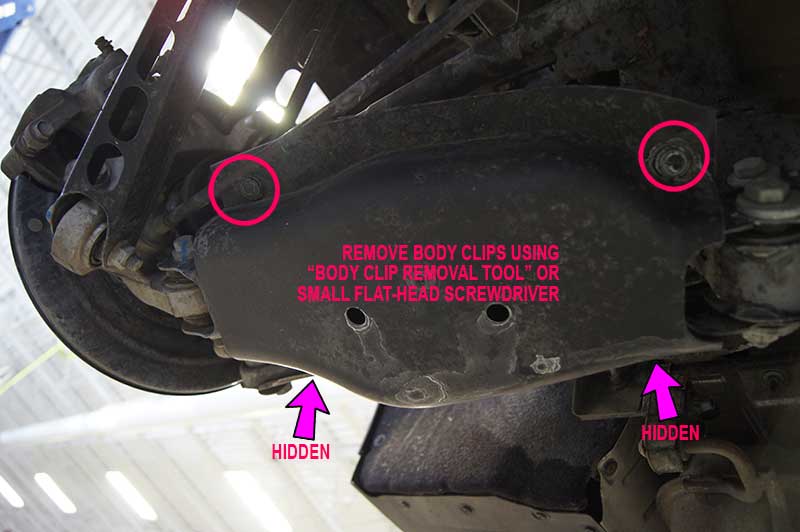
- First, remove the 4 plastic body clips holding the lower control arm cover in place. These can be tricky, so use a tool similar to the one pictured or carefully use a flat-head screwdriver.
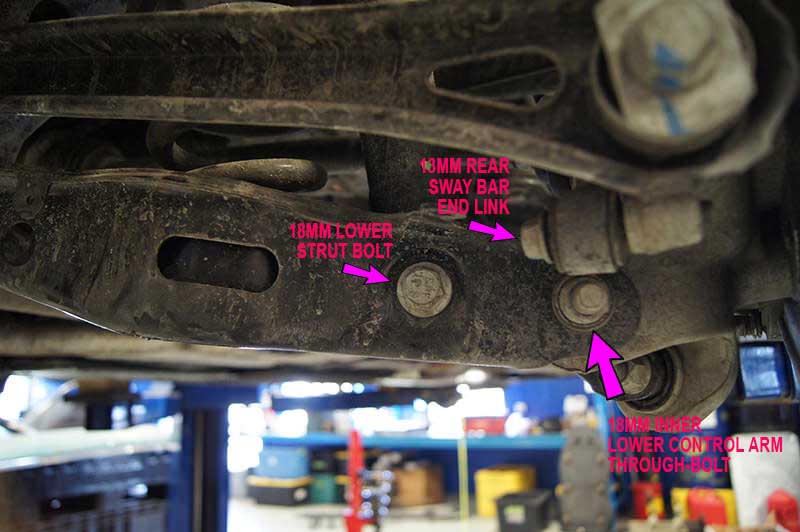
- Remove the rear sway bar end link bolt. It is a 13mm bolt.
- Next, remove the outer lateral arm through-bolt and loosen (but do not remove) the inner lateral arm through bolt and move the arm down, this will allow you access to the bolt in the next step.
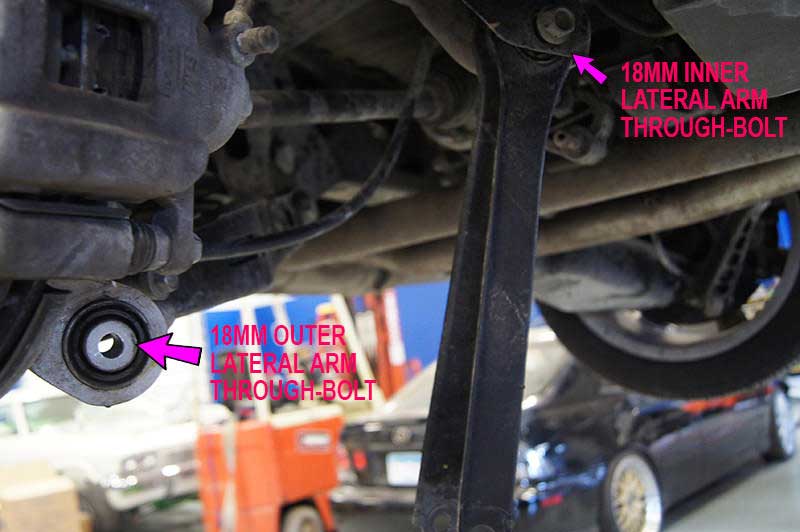
- Next, remove the outer lower control arm 18mm through-bolt. Loosen (but do not remove) the inner control arm 18mm through-bolt. note* pay close attention to the OEM caster/camber/toe markings. These are very important. While an alignment is highly suggested when performing suspension upgrades, keeping these as close to their OEM designations will make the drive to the alignment shop much better.
- Remove the three body clips near the top of the strut. Gently pull back the insulation to reveal the shock mount. Remove the three 13mm shock mount bolts. There are two bolts towards the rear of the car and one up front.
- Using a portable spring compressor, compress the rear spring as it will remove tension and allow you to proceed through the next step much easier.
- Remove the lower strut 18mm bolt. This will free up the rear shock. Be careful as the rear spring may fall out, and since it's compressed, it may launch across your garage if it falls on the floor.
- Set aside your springs and rear struts. Keep them together to avoid confusion.
Installation of Front Eibach Springs
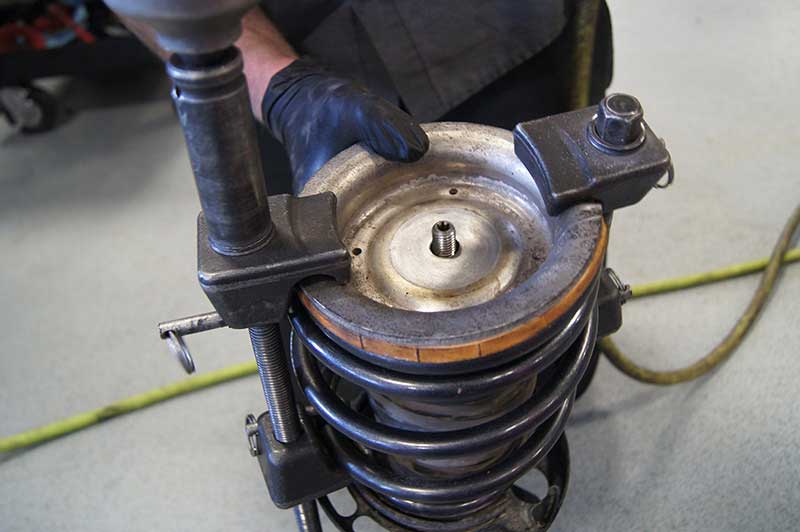
- Use a portable spring compressor and carefully disassemble your front strut/spring combo. To do so, attach the compressor arms to the top plates, directly across from each other. Attach the bottom arms on the lower portion of the spring.
- Compress the springs and remove the strut plate mounting bolt. It is 18mm and comes off fairly easily.
- Now you should be able to disassemble the assembly. Set each component in a line, in order of removal. Doing this makes it easier to re-assemble the unit. Replace the OEM bump-stops with the Eibach supplied bump-stops.
- Reassemble the strut/springs combo.
- Compress the new Eibach lowering springs the same way you did the stock springs.
- Attach the top plate and fasten the securing nut to the top of the strut. Slowly decompress the assembly.
Repeat the process for the other side. Don't forget the new bump-stop!
Follow the removal steps in opposite order to re-install your new assemblies.
Installation of Rear Eibach Springs
The rears are a bit easier to put back together since they are not coil-over-strut type assemblies. But first things first, you need to remove the strut top plate and install the Eibach supplied bump-stop. This is an 18mm nut. The best way to remove this nut is to use a closed-end wrench and slide it over the nut while using a locking pliers to hold the strut shaft in place. See the attached picture for clarification. Don't forget your dust cover when putting it all back together.
- Start by installing the top mount for the struts. Don't forget to push the dust cover fasteners in place after tightening the nuts. With the shock re-installed, it is easier to install the spring.
- Using your spring compressor, compress the springs. Insert the springs into their retainers, and hold them in place while you fasten your lower shock mount.
- Install the outer lateral link through-bolt but don't torque it down yet. Decompress the spring and remove the compressor from the car. Using a floor jack, "compress" the spring under the control arm. This will simulate the weight of the car. At this point, you may torque both the inner and outer lateral arm bolts and remove the floor jack after doing so.
- Re-install the rear sway bar end link bolt and check all bolts you've loosened to verify they are tight. Also, verify you're in line with factory alignment marks. If everything looks good and tight, re-install the plastic cover.
- Put your wheels back on, remove the car from your stands or lift, and take the car around the block a few times while listening for any strange noises/clunking that would indicate something is wrong.
Enjoy the Benefits of Improved handling via the Eibach PRO-KIT!
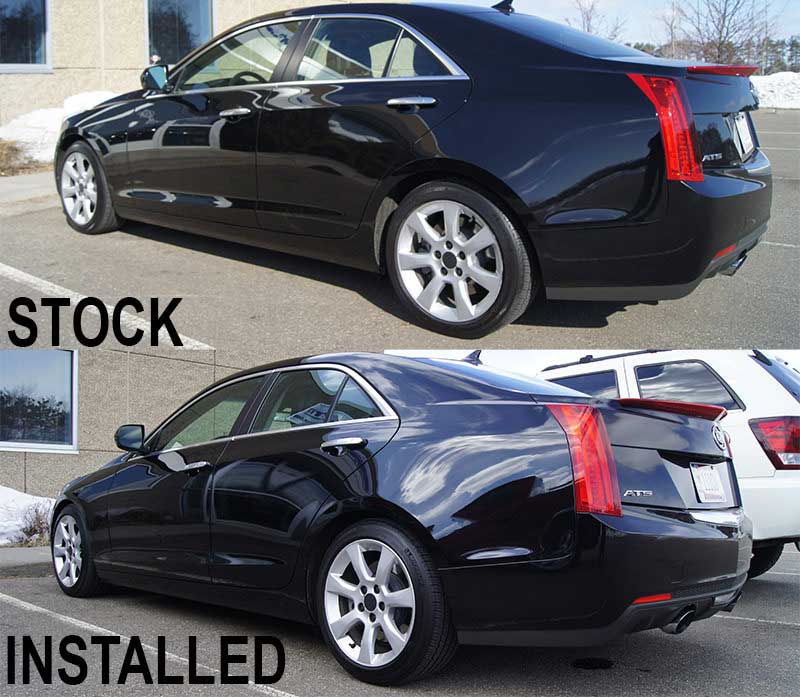
Don't get too excited expecting an immediate drop! New springs require time to settle, usually 100 miles of so. Make sure you get an alignment done immediately, as avoiding one could result in tire wear or suspension damage.


Comments (1)
Is the installing process the same for the 2013 2.5 model?